Sketching astronomical objects
This site is dedicated to my astronomical drawings.
Sketching deep-sky objects helps to improve observing skills.
Over time - my technique should become better...
- You are here:
-
Home

-
English (en-GB)
-
Astrosketching
- Astrosketching - Articles
Self made
Star maps
Astrosketching - Articles
Tuesday, January 8, 2008
Training the observer's eye
Back in November 2004, I made my first astronomical drawing. I was impressed by the realism of the picture - it reflected the object exactly as I had seen it in the eyepiece.
If I would draw the same object now, the sketch would show much more details because I gained more observing skills in the mean time. That is what makes sketching so exciting.
Documentation and comparison
The sketches on this site not only document experience growth over time, they also offer an impression of what small amateur equipment is capable of and how objects visually appear in different instruments. Let me show you an example:
The very first sketch - M42 (Binoculars)

The same object - a few years later... (binoculars)

M42 once again (Rich Field Telescope)

M42 one more time (8 inch dobsonian Telescope)

remembering beautiful moments
Besides all that, the drawings always remind of many beautiful starry nights. Especially when the German weather is playing tricks on us, a glass of red wine and a sketch book put things right again...
Tuesday, January 17, 2008
During the years I experimented with different sketching techniques. This article describes my actual drawing system.
the initial sketch
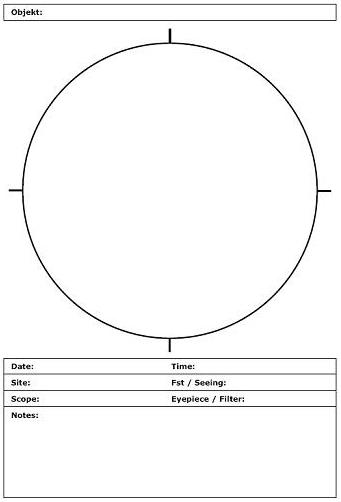
The initial sketch is made at the telescope with black pencils on a printed sketch template (PDF) on white DIN A5 sheet. The use of thick paper will avoid humidity problems.
Sketch template
I first observe the object carefully trying different eyepieces and telescopes.
Then I start sketching. A self made magnetic red lamp attached to the telescope gives off enough light without destroying the eye's darkness adaptation.
To record subjective impression of brightness, I use numbers reflecting a magnitude scale from 1 to 10.
Example: stars in M6 - butterfly cluster - Scorpio

Everything is allowed - except erasing errors by rubbing out parts of the sketch. I use written comments in stead or just strike throughs to correct the drawing. Often several drawings are needed because not all details can be captured in only one sketch.
Example: correcting errors in M70 - Globular Cluster - Sagittarius

The same numbered magnitude scale is used for nebula.
Example: Using numbers in Nebula (M42 and M43 - Orion)

But also written comments can be used to express visual appearance. Here another M42 with (dutch) comments:

the "Rotring" technique (stars)
At home, a new drawing on black paper is made. I tried out many sorts of pens, but only Rotring Micronorm pens delivered the desired result. I use 0.18mm pens for the faintest stars and 1mm for the brightest. Other thicknesses I use are 0.35 and 0.5, 0.7mm. The white ink appeared to be difficult to get. (Rotring Part Nr. R 591 018).
Rotring Micronorm

A pair of compasses is handy for creating eye piece circles

The "Faber CasteL" technique (Nebula)
Above mentioned magnitude scale corresponds to about 10 different Polychromos Faber Castel pencils in the range from almost white to dark grey.
Faber Castel Polychromos Pencils

Here are the original Faber Castel numbers and names. The first two ("Dicky" and "Jolly") are no Faber Castel pencils, they're wax pencils - up to now I didn't use them since no nebula shines so bright ;).
Grey scale for magnitudes


The finishing touch
The drawing is complete after making necessary blurring and smearing. I found out that the best way to to this is by using the so called pressed paper "Estompen" pens:

After adding observation data the sketch is ready to be archived. If the sketch is really good, it can be scanned and published on this web site. I noted that scans of drawings on black paper produce much more realistic pictures than drawings on white paper that were inverted.

